 Home and Gardening Ideas At home and Gardening ideas we believe inspiring readers about homesteading, self sufficiency
Dollar store Christmas Ornament Wreath
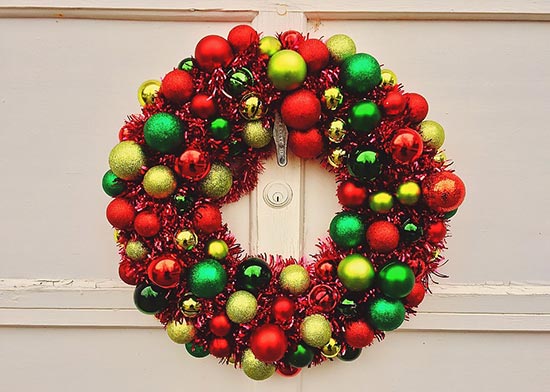
Dollar Store Christmas Ornament Wreath 🎄✨
Are you ready to wow your guests this holiday season without blowing your budget? 🤩 Imagine stepping into your home and being greeted by a dazzling wreath made from nothing more than dollar-store finds and a little creativity. That’s what the “dollar store ornament wreath” is all about. In this post you’ll learn exactly how to make one, why it’s such a great idea, smart tips to personalise it, and answers to common questions people ask. Whether you’re a craft novice or a seasoned DIYer, get ready to create a show-stopping piece of décor for less than many store-bought versions.
👉 Plus, don’t forget to check out this video tutorial to help you visualise the process:
Why Make a Dollar Store Ornament Wreath?
Here’s why this project is worth your time:
- Budget-friendly – You’ll use inexpensive ornaments and supplies (many from your local dollar store), meaning you can achieve high style at low cost.
- Customisable – Choose your colour palette, size, and finish to match your home décor or theme (e.g., traditional red/green, modern metallics, rustic woodland).
- Quick & fun – Unlike some lengthy craft projects, this one can come together fairly quickly and offers immediate impact.
- High-impact décor – A full ornament wreath looks luxurious and layered, giving the impression of a higher-end piece without the price tag. (Many DIY blogs show how folks used dollar store ornaments and wire or foam frames to great effect.) C’mon Get Crafty+2DIY Beautify+2
- Festive & reusable – When done well, this wreath can be used year after year (or refreshed with a few new baubles each season), making it a smart investment in your décor.
How to Make Your Own Dollar Store Ornament Wreath
Here’s a step-by-step guide. Feel free to follow the video above and use this as your go-to reference.
Supplies You’ll Need
- A wreath frame (wire, foam or grapevine) – choose a size that fits your door or wall space.
- A collection of ornaments from a dollar store (mix sizes, finishes, colours).
- Hot glue gun + glue sticks (ensure you’re comfortable with hot glue safety).
- Ribbon or fabric strips (optional) – for wrapping the base or adding accent.
- String or wreath hanger to display the finished piece.
- (Optional) Additional decorations like picks, faux greenery, berries or fairy lights if desired.
Step-By-Step Instructions
- Prepare the base – Wrap your wreath form with ribbon or fabric strips if you like a full look underneath the ornaments; this also hides the frame and gives extra texture.
- Sort your ornaments – Lay out your ornaments by size and colour. A mix of small, medium and large baubles gives depth and interest.
- Start gluing – Begin gluing the largest ornaments first around the outer edge of the wreath. Press firmly until dry.
- Fill the gaps – Next, glue the medium and small ornaments in between the larger ones to fill any bare spots. Try to stagger sizes and colours for visual balance.
- Add accents – If you have extra decorations (berries, picks, lights), tuck them in around the ornaments and secure with glue if necessary.
- Attach hanging mechanism – Loop a ribbon or cord around the back of the wreath for hanging, or attach a standard wreath hook.
- Hang and enjoy – Place the wreath on your door, wall, or above the mantel and step back to admire your budget masterpiece.
Tips to Make It Stand Out 🎅
- Mix finishes: Combine shiny, matte and glitter ornaments for texture and visual interest.
- Use a colour theme: Pick 2-3 colours (e.g., gold + white + silver) to avoid a chaotic look.
- Unbreakable ornaments: Especially if mounting outdoors or in a windy spot, choose plastic or shatterproof ones. Some DIY guides recommend this. DIY Beautify
- Layer depth: Start with your largest pieces, then layer smaller ones on top to create dimension.
- Secure well: Use enough glue and press ornaments firmly; some bloggers mention the tedious nature of ensuring full coverage but say it’s worth the effort. C’mon Get Crafty+1
- Add fairy lights: If your wreath is large and visible at night, integrate a small battery-powered light strand for sparkle.
- Properly protect: If outdoors, consider a clear sealant spray if the ornaments are vulnerable to weather, or display under cover.
- Store carefully: After the season, place the wreath in a box to preserve its shape and protect ornaments from crush damage for reuse next year.
Frequently Asked Questions (FAQs)
Q: How many ornaments will I need?
A: It depends on the size of your wreath. For a standard 18-24″ diameter frame, you might use 40-60 ornaments (mixing sizes). Big ones go first, smaller ones fill gaps.
Q: Can I use tinsel or garland instead of fabric to wrap the wreath form?
A: Yes! Wrapping the base with tinsel or garland is a great alternative to fabric strips—just ensure you still have a solid base to glue onto so the ornaments stay secure.
Q: Can I make this wreath outdoors?
A: You can, but with caution. Use weather-resistant or plastic ornaments, and consider applying a clear protective spray. Also hang the wreath under cover to protect from rain/snow where possible.
Q: How long will it take to make?
A: For a 24″ wreath, budget about 1-2 hours including prep. If you’re very detailed (colour sorting, adding lights, finishing accents) maybe 2-3 hours.
Q: What if I miss a few bare spots?
A: That’s perfectly fine! Because the wreath is busy and layered, a few gaps often don’t show. In fact, one DIY blogger said: “Honestly, I still missed a few spots, but the wreath is so busy, it is hard to tell.” C’mon Get Crafty
Q: Where should I hang this wreath?
A: Options include your front door, above the fireplace, on a wall in your hallway, or even inside a large window facing out. Choose a location where the size fits the space and it’s visible for maximum impact.
Final Thoughts
Creating a dollar store ornament wreath gives you the perfect blend of affordability, creativity and festive style. 🎁 With a little time, some dollar-store supplies and these tips in hand, you’ll end up with a piece of décor that looks custom-made for a fraction of the cost. Whether you’re decorating your own home or making a gift for a friend, it’s a project that delivers big on wow factor and small on budget.
So gather your ornaments, fire up that hot glue gun (carefully!), and get ready to craft your way into the holiday spirit. And when you’re done, hang your wreath with pride and let the compliments roll in. Bold, bright and budget-beautiful — that’s your vibe this Christmas.