 Home and Gardening Ideas At home and Gardening ideas we believe inspiring readers about homesteading, self sufficiency
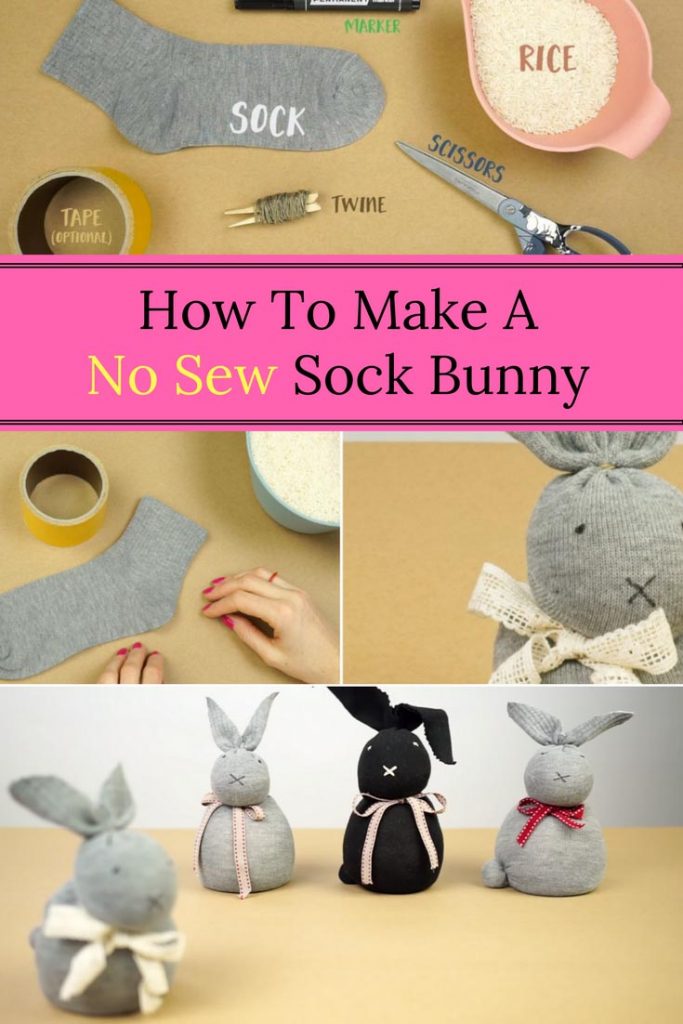
How To Make A No Sew Sock Bunny
If you are a bit lost with craft ideas this Easter then you have to try and make a no sew sock bunny. Why not turn a sock into a great Easter Sock Bunny for a fun new friend for your kids this Easter ? This simple, no-sew sock bunny is so easy—even the kids can do it with you!
If you are looking for a way to entertain your kids during this Easter season, or you want some activities that would make you busy during this season, making a DIY sock bunny will be appropriate. It is simple to craft one, and your children will enjoy to make and play with them.
Making these sock bunnies is not difficult. In fact, it takes so little of your time and cost almost nothing to make one. Gather socks that lack partners. Ensure you get as many as you can; also choose differently colored socks.
You do not need any professional artisan as these only need less than 5 minutes of your time. So let us jump right into the No sew sock bunny making process.
Tools and supplies
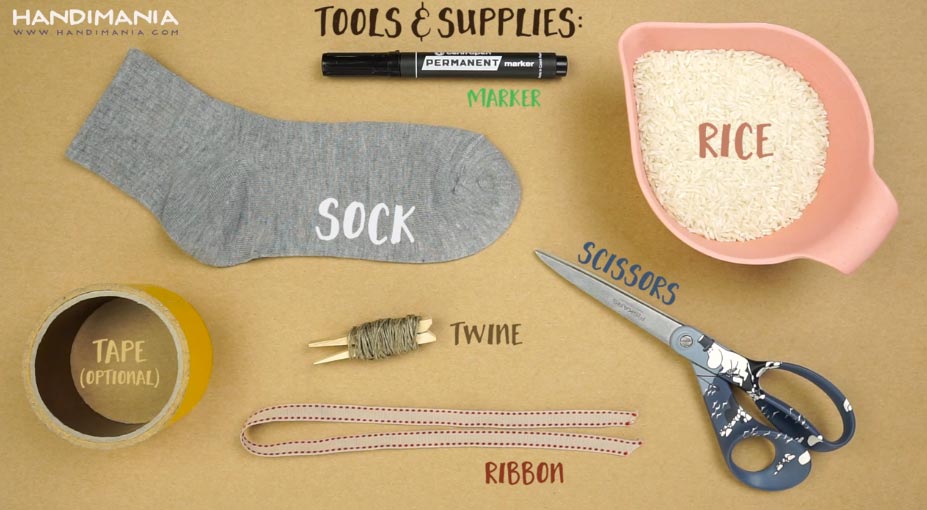
- A pair of scissors
- Tape( though not necessary)
- A few cups of rice( Although, using grit can be a good option)
- Twine
- A sock
- A ribbon
- A marker
- Once you have gathered the tools use the following steps
Step 1
Take your sock and fill its toe with rice. You may consider using the large tape tube to help keep the mouth of the sock open, while others may use a funnel while pouring the rice. This will prevent you from spilling the rice on the floor. Fill the sock to the beginning of the heel so that it can stand by itself.
Step 2
Ensure that the toe has more rice than the upper top. However, ensure to form a well-shaped cylinder. Squeeze from the heel to form a small round head and a bigger body. This helps to distinguish between your bunny’s body parts. In addition, leave some space at the top of the sock for the ears.
Step 3
Use the twine to tie the upper part of the heel. This will distinguish between the head and the ears.
Step 4
Cut off the remaining upper part of the heel using your pair of scissors. This will make beautiful oval-shaped ears. However, get them to look symmetrical. Ensure that you trim off unnecessary material from the sock that would make the ears appear deformed.
Step 5
Use the ribbon and the twine to tie the middle of the head and body. The ribbon should appear at the top to make it look appealing. Ensure that the ribbon’s color can match with the sock’s color.
Step 6
Take the marker and make two small dots that make the eyes and an X to make the mouth. Ensure that they are evenly spaced.
You can also add a small tail for the bunny. Pinch a small part of the sock bunny’s body from the toe and use your twine to make the tail. You can also use a small cotton ball to make the tail if using the other method does not work for you.
Conclusion
With these easy steps, you can create as many sock bunnies as you want. Leave your children, along with their friends, to play with the sock bunnies as they hop from one corner to the other.
Here’s the video Tutorial … Enjoy!


One comment
Pingback: Easter Craft: No-Sew Sock Bunny