 Home and Gardening Ideas At home and Gardening ideas we believe inspiring readers about homesteading, self sufficiency
Easy Steps To Making an Automatic Chicken Waterer

Chickens don’t require a lot of complicated care steps, but they do need an abundance of water to lay the eggs we want. You will find yourself making the walk to your chicken coop several times throughout the day to ensure your chickens have water. That doesn’t seem like a huge deal, but making an automatic chicken waterer will save you time. Time is a hot commodity!
It is a simple design. You store the water in a large, five-gallon bucket. You do have to consider how you will mount the bucket because it should weigh close to 40 pounds. Other options include larger containers; you have to find something that works for your project. You attach nipple feeders to the tube that chickens can peck at and receive water.
Project Parts:
- A Large Drum with a threaded hole for a PVC pipe OR a bucket and a drill to create the hole yourself. You will need to caulk around the hole to ensure no leaking takes place.
- ¾ in PVC Pipe
- ¾ in by ½ in FPT (female pipe thread) PVC Elbow
- 2 PVC End Caps
- Four chicken nipple feeders
- Pipe cutters
- Teflon Tape
- Silicone Sealant
Instruction :
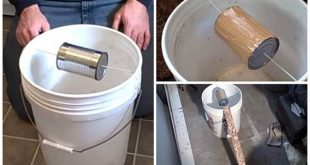
1 – First, you either need to create a hole in your bucket with a drill or purchase a drum with the hole already created.
Attach the FPT PVC elbow into the hole of the container. Insert the PVC pipe into the elbow and make sure the end cap is connected. The end cap is crucial because it stops the water from flowing out, so don’t forget it.
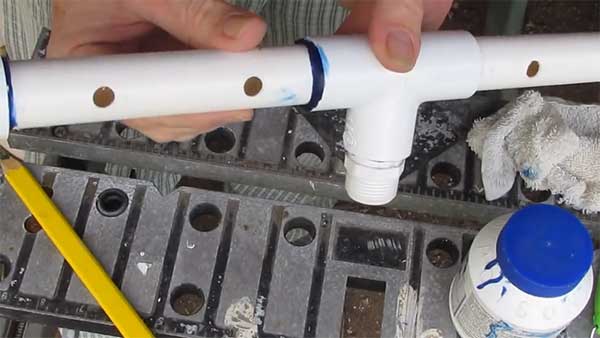
2 – Measure the PVC pipe that you have. This is where you want to attach the nipple feeders. We used four feeders, but you might want to add more depending on the size of your flock! The length you want to cut the pipe depends on how much chicken feeders you want to use. You can use pipe cutters, but if you don’t own those, try a hand saw! We cut two pieces of the 3/4 in pipe to be 6.75 inches long.
3 – Measure the placement for your nipple feeders and use a small drill bit to make holes to mark the spot. Make sure to place them with the end caps on the pipe! Use an 8.5 drill bit to create the hole for the feeder nipple.
4 – Use a threader to make a grip inside of the PVC pipe.
5 – Paint the inside of the end cap and elbow with a silicone sealant to ensure no water leaks out.
6 – Wrap Teflon tape around the nipples which will prevent any water from leaking out. Then, insert into the PVC pipe. Wrap the tape also around the elbow that inserts into your drum or bucket.
7 – Figure out where you want to situate your water. Since it is heavy, you might want to set on a cinder block or a different surface, but it has to be at a height your chickens can reach.
8 – Fill with water once you situate the feeder. Check for leaks. Then, your chickens are good to go!