 Home and Gardening Ideas At home and Gardening ideas we believe inspiring readers about homesteading, self sufficiency
How To Transfer A Photo To Wood
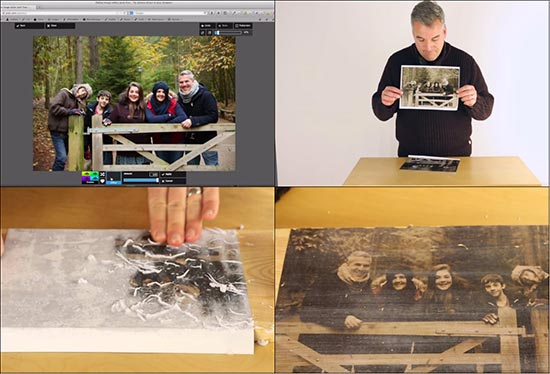
Have you seen photos imprinted on wood and wanted one? Well, stop wishing and make your own with this video! If you would like to know How To Transfer A Photo To Glass then see this article here.
📸 How To Transfer A Photo To Wood (The Easy DIY Way!)
Want to turn your favorite photos into rustic, timeless wall art? 🪵✨
Transferring a photo to wood is one of the most creative, budget-friendly, and heartfelt DIY crafts you can try — whether you’re decorating your home, gifting something meaningful, or just love crafty projects.
In this post, we’ll break down step-by-step how to transfer a photo to wood using simple tools. It’s shockingly easy and the results? Absolutely stunning! 😍
🎥 Bonus: Watch the full video tutorial here 👉 YouTube: How To Transfer a Photo to Wood
🛠️ What You’ll Need
Here’s your basic toolkit for photo transfer magic:
- A laser-printed photo (not inkjet)
- Wood surface (flat & unfinished works best)
- Gel medium (Mod Podge works well)
- Sponge or brush
- Spray bottle of water
- Credit card or scraper
- Clear sealer (optional)
📌 Pro tip: Use light-colored or unfinished wood for best results. The photo’s details show up beautifully against a pale background.
🧠 Why Transfer Photos to Wood?
There are dozens of reasons people love this project:
✅ Unique gifts – Great for birthdays, weddings, anniversaries
✅ Home décor – Rustic art adds charm and warmth
✅ Budget-friendly – Much cheaper than buying custom prints
✅ Eco-conscious – Reuse scraps of wood instead of buying frames
✅ Meaningful keepsakes – Preserve family memories creatively
🔄 How To Transfer a Photo to Wood (Step-by-Step)
Follow these steps, or watch the full tutorial here:
Step 1: Choose and Print Your Photo
🖨️ Make sure it’s laser printed on regular paper.
Mirror the image if it includes text — it will transfer in reverse.
Step 2: Prepare the Wood
🪚 Sand the wood lightly to make it smooth and dust-free. The smoother the wood, the cleaner your image will look.
Step 3: Apply the Gel Medium
🖌️ Using a sponge brush, coat the printed side of the photo with gel medium. You want a generous, even layer.
Step 4: Press the Photo Onto the Wood
📄 Flip the photo image-side down onto the wood.
Smooth out any air bubbles using a credit card or scraper.
Step 5: Let It Dry Completely
🕓 Dry for at least 8 hours, or overnight for best results.
⛔ Don’t rush this step — it’s crucial!
Step 6: Wet and Rub Away the Paper
💧Spray the paper with water, wait a few seconds, then gently rub it off with your fingers or a soft cloth. You’ll start to see the image appear like magic!
Repeat this step a few times until all the white paper fuzz is gone.
Step 7: Seal It (Optional)
🎨 Add a coat of Mod Podge or clear sealant to protect the image and give it a finished look.
💡 Pro Tips for Best Results
✨ High contrast photos work best — darks and lights show up beautifully
✨ Avoid inkjet prints — they’ll smudge or not transfer at all
✨ Use scrap wood for practice before you start on your final piece
✨ Burn the edges or stain the wood for a vintage effect
✨ Try black & white photos for an old-school, rustic vibe
❓ FAQ: Common Questions About Photo Transfer to Wood
Can I use inkjet prints?
Not recommended. Inkjet ink tends to bleed or wash away. Laser prints are essential for clean transfers.
Will it work on stained or painted wood?
You’ll get better results with unfinished, light wood. Dark or sealed wood may prevent the image from adhering well.
Can I transfer colored images?
Absolutely! 🎨 Colored photos transfer beautifully as long as they’re laser printed.
Is Mod Podge the same as gel medium?
Mod Podge works great as a gel medium, especially the photo transfer version. Just make sure it’s not the glossy or glitter type unless that’s your intended effect.
Can I use wood rounds, crates, or furniture?
Yes! This method works on nearly any wooden surface — try coasters, boxes, trays, or even old cabinet doors.
🏆 Final Thoughts: Why You’ll Love This DIY
✅ Affordable – No fancy equipment needed
✅ Memorable – Makes meaningful gifts
✅ Creative – Add your own flair with stains, paints, or decorative edges
✅ Beginner-friendly – Anyone can do it with minimal supplies
✅ Reusable – Great way to upcycle scrap wood
📌 Share Your Project!
Once you try this, you’ll be hooked! Show off your finished photo transfers by tagging your posts with #PhotoOnWoodDIY and inspire others!
🎥 Don’t forget to watch the step-by-step video here:
👉 How To Transfer a Photo to Wood on YouTube
🌟 Like This Tutorial? You’ll Also Love:
- How To Make Homemade Natural Paint (Flour Paint Recipe)
- 10 Crafty DIY Gifts That Cost Less Than £5
- Top 5 Rustic Décor Ideas Using Scrap Wood
Now it’s your turn! Grab that favorite photo and turn it into something timeless. Your wall, shelf, or coffee table will thank you. 😄


One comment
Pingback: How To Transfer A Photo Onto Glass - Home and Gardening Ideas