 Home and Gardening Ideas At home and Gardening ideas we believe inspiring readers about homesteading, self sufficiency
Testing Home Canned Jars for Spoilage
Nothing tastes as good as home canned soups or fresh vegetable from the garden in the middle of the winter. It’s a burst of flavor in your mouth, reminding you of the abundance of the summer. You might can just a few things or a whole pantry full of colorful jars. Either way, you need to know how to test home canned jars for spoilage.
How to Test Jar Seals
If you’ve canned before, you know how lovely the “pop” or “ping” sound that comes from the jars after canning while they’re cooling on the counters. When you can large batches, it’s like a chorus of pings and pops letting you know that the lids are sucked down by the vacuum seal as the contents start to cool and contract inside the jars.
Home canned jars should be allowed to cool for 12 to 24 hours, undisturbed, on your countertop for 12 to 24 hours until they’re fully cooled. Once the jars are cooled, you can remove the screw bands and test the seal in a few ways.
Make sure you don’t test the jars when they’re still hot! They need time to seal correctly. Then, try one of these methods.
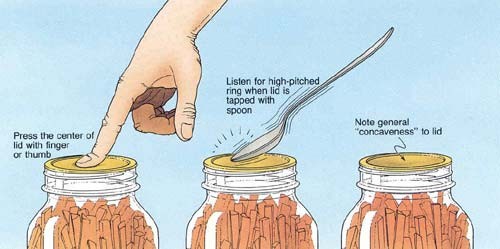
Method 1
Use your finger or thumb to press down on the middle of the lid. If the top pops back up when you let go with your finger, that means the lid isn’t sealed, and it needs to be reprocessed.
Method 2
Tap the lid with a metal teaspoon. If you have a clear ringing sound, you have a good seal on the jar. If it has a dull sound, the lid isn’t properly sealed.
It also might mean that the food is in contact with the underside of the lid, which means you filled up the jars too far, without the right headspace. Take a look to see where the food stops. If it’s in contact with the lid, that doesn’t mean the food is unsafe.
Method 3
Bring the canned jar up to at your eye level and look across the lid. It should be concave, which means it has a slight downward curve in the center. If the top is flat or bulging, it might not be sealed.
What Do You Do If the Jars Aren’t Sealed Right?
We’ve all had times when our jars didn’t seal right, and it’s a huge bummer. You have three choices: refrigerated the contents, freeze the jar, or plan to eat soon or reprocess the food within 24 hours.
How to Reprocess Canned Jars That Are Unsealed
So, you found out that your jars didn’t seal and you want to reprocess because you don’t want to eat them right now. That’s okay! You discovered the unsealing between 12 to 24 hours of canning.
To reprocess, you can change the jar if you want. Use a new, unused lid, and reprocess the jars the same way that you did before. All reprocessing must be done before 24 hours using the same processing time. You can adjust the headspace in unsealed jars to ½ inch.
NOTE: You MUST use a brand new lid. Don’t reprocess with the same lid that failed.
Signs of Spoilage
If you didn’t check a batch of home canned jars after you processed them, you need to look for signs of spoilage before using the contents. A few signs of spoilage include:
- A bulging lid
- Leaking around the top
- Mold
- A strange odor when opened
- Spurting liquid when opened
Be Cautious With Low Acid and Non-Acidic Foods
Jams, sauces, jellies, relishes, and other acidic foods don’t have as high of a risk of botulism as low acid and non-acidic food. Most vegetables, meats, seafood, beans, and soups are examples of low-acid food. Improperly canned low-acid foods can care botulism spores without any signs of spoilage. That’s why it’s so important always to know how someone else canned their food if they gift it to you.
Improper canning of low-acid is:
- The food wasn’t processed in a pressure canner. A water bath canner isn’t acceptable for low-acid foods.
- The canner’s gauge is inaccurate.
- The right pressure and processing times were not used for the size of the jar used and style of packing.
- Unapproved ingredients were added to the recipe, such as milk or noodles.
- Proportions of the ingredients were changed from the original recipe.
- The processing times and pressures were not adjusted based on the altitude at which the food was canned.
- If lemon juice or vinegar wasn’t added to tomato products, it could be contaminated.
How to Properly Identify and Handle Spoiled Home Canned Foods
First and foremost, never taste food from a jar with an unsealed lid or that shows signs of spoilage. That’s dangerous. You can end up with food poisoning or worse.
Look for Signs of Spoilage
Many signs of spoilage are easy to detect as long as the rings – the screw bands – are removed. Often, bacteria and yeast create gases that cause pressure in the jar, swelling the lids and breaking the seals. Always look at the lids for tightness and seal, even if you checked them after you processed them.
Examine the Outside of the Jar
Hold the jar up at eye level and examine the outside of the jar. You want to make sure there are no dried streaks of food on the outside of the jar. Look for any rising air bubbles as well.
Open and Smell
Here comes the fun part. Open the jar and take a good sniff. Does it smell as it should? Check for any strange odors, as well as spurting liquids.
Check for Mold
Last, check for cotton-like mold growth. You might find white, black, blue, or green mold growth on the surface top of the food. Mold also grows on the underside of the canning lid.
Cleaning Spoiled Jars
When you do discover that one of your jars of food is spoiled, dispose of the contents. You want to boil the jars in water for 10 minutes to kill off any bacteria or mold spores that could continue to live on the surface. This step is essential to avoid it happening again in the future. Make sure to toss out the lids and rings in a sealed container to prevent spores from spreading in the trash.