 Home and Gardening Ideas At home and Gardening ideas we believe inspiring readers about homesteading, self sufficiency
How To Build A Five Gallon Bucket Hydroelectric Generator
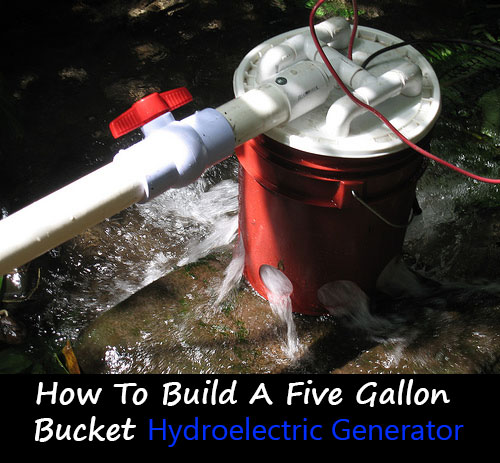
With self-sufficiency on the rise these days with us all dreaming of that off grid life, it is common to see people trying to set up their own power or water supply. Recycling is almost a regular thing now so those who want to live really independently choose a hydroelectric generator as their next DIY project to make.
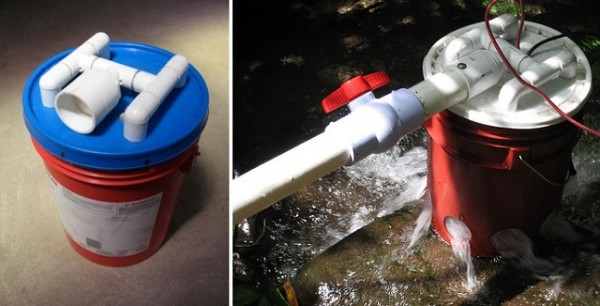
This generator is easy to build and easy to maintain. The way that this 5 gallon bucket hydroelectric generator was constructed was to use common martial that most people could get there hands on. Most of the components used in the generator are readily available just about anywhere in the world. A 5-gallon bucket should be your base and the rest will easily fall into place. As you can see from the images, the parts you use should not be hard to get, actually readily available in any location you might be. Follow the instructions from the video tutorial. You are now able to produce small amounts of electricity for your own use. Watch the video below and then
This build manual provides step by step instructions for the construction of the Five Gallon Bucket Hydroelectric Generator developed by Sam Redfield with the Appropriate Infrastructure Development Group (AIDG) in Guatemala. This manual offers guidance for selecting the tools and materials needed to make the generator, as well as techniques involved in its construction
The power of the generator is dependent on the load that is connected to the system. The maximum power of 90W was achieved when a resistive load of 5 ohms was connected to the generator. As an example, a power of this magnitude is sufficient to power three 30W UV water treatment systems. Alternatively, it could power up to 80 one watt LED lights (dependent on line losses and draw from the inverter used).
Here is a list of materials that you will need ( i know the list is large but i bet you have most of them in your workshop already 🙂
Materials
Permanent Magnet Alternator and Body of the Generator
• One Supercore Permanent Magnet Alternator with fan assembly
• One five gallon bucket
• Three five gallon bucket lids
PVC Pipe and Fittings – Buy Here
• Four 3/4” 90 degree couplings
• Three 3/4” T’s
• Eight 3/4” straight couplings
• Four 3/4” to 1/2” adaptors
• One 3/4” to 2” adaptor
• Eleven 3/4” x 1 3/8” PVC pipe
• Four 3/4” x 3 1/4” PVC pipe
• Four 1/2” 90 degree couplings*
• Four 1/2” Plugs*
• Eight 1/2” x 1 3/8 PVC pipe
• Twelve 1/2” 45 degree couplings
• Two 2” straight couplings
• One 2” x 1 3/4” PVC pipe
• PVC cement
Threaded Rod and Hardware to Mount PMA to Bucket Lid – Buy Here
• Four 10-24 Pieces of threaded rod 4 ! ” long
• Eight 3/16” x 1 1/4” Fender Washers
Five Gallon Bucket Hydroelectric Generator Build Manual – Version 1
page 7 of 35
• Eight 10-24 lock washers
• Eight 10-24 washers
• Twelve 10-24 nuts
Threaded Rod and Hardware to Mount Splash Guard to PMA – Buy Here
• One 3/8” piece threaded rod at 3”
• One 3/8” piece threaded rod at 1 3/4”
• Four 3/8” fender washers
• Four 3/8” nuts
• Eight 3/8” lock washers
• Eight 3/8” washers
Hardware to Attach the Turbine to the PMA
• Four washers 3/4” ID, 1 3/4” OD.
Other Hardware and Materials – Buy Here
• 32 Pop Rivets – 1/8” diameter, 1/4” long
• Silicon Caulk
• Two 2” Straight Couplings
• One 2” PVC pipe 1 3/4” long
Tools – Buy Here
• Drill Press
• Power Hand Drill
• Table Saw
• Electric Mitre Saw
• Two Plywood Saw Blades (one for table saw and one for electric mitre saw)
• Hack Saw or metal cutting blade for the electric mitre saw
• Hole Saws
-7/8” hole saw for pipe stems in splash guard
-1 1/8” hole saw for manifold in manifold assembly
Five Gallon Bucket Hydroelectric Generator Build Manual – Version 1
page 8 of 35
-2 1/4” hole saw for the exit port in the bucket
• Drill bits
-1/16” for pilot holes
-1/8” for pilot holes and pop rivet holes
-3/16” for 10-24 threaded rod in manifold assembly
-1/4” for pilot holes
-5/16” for orifice in nozzle
-3/8” for pilot holes
-1/2” for pilot hole in turbine, outside diameter of orifice in nozzle and 3/8”
threaded rod in splash guard
-5/8” for center hole in turbine (a precision bit is best)
• Utility Knife
• Compass
• Ruler
• Ball Point Pen (that fits in compass)
• Pencil
• Awl, or similar marking tool
• Pop Rivet Gun
• Channel Locks
• 120 Sand Paper
• Wrenches
-15/16” open ended for PMA shaft nut
-5/16 allen key for PMA shaft
-9/16” open ended for 3/8” nuts
-3/8” open ended for 10-24 nuts
-1/2” open ended for negative PMA lead
-7/16” open ended for positive PMA lead
Safety Equipment – Buy Here
• Safety Goggles
• Ear Protection
• Respirator
Download the PDF Tutorial HERE...
This video below shows shows some of the assembly, as well as the generator in action.


One comment
Pingback: How To Build A Five Gallon Bucket Hydroelectric Generator